Support Central
Includes a hard hat, face shield, and ear protection. Steel-toe boots: For foot protection and grip. Work gloves: Heavy-duty leather or synthetic. Eye protection: Safety glasses under the face shield. 🔍 Step 1: Pre-Felling Assessment
The hinge "holds" the tree to the stump and guides it down like a door hinge. Without a hinge, you lose all control over the fall. ⚠️ Step 3: The Final Fall “Nuts & Bolts” of Tree Felling
The notch determines the direction of the fall. It should go about 1/4 to 1/3 into the trunk. Start at a 60-degree angle downward. Bottom Cut: Cut horizontally to meet the top cut perfectly. The Goal: A clean "mouth" facing your target landing zone. 2. The Back Cut This cut provides the power to push the tree over. Includes a hard hat, face shield, and ear protection
As the back cut opens, the tree will start to move. Eye protection: Safety glasses under the face shield
💡 If the tree is larger than your guide bar, or if it has a heavy lean against your intended direction, stop and call a professional arborist. To help me tailor this guide further, let me know: The type of tree (Hardwood or softwood?) The estimated height or diameter
The strip of uncut wood between the notch and the back cut is the . It should be about 10% of the tree's diameter.
Once the tree begins its descent, kill the saw and move immediately down your pre-planned escape route.
After you have installed the plugin, open Microsoft Word and click File from the menu bar at the top.
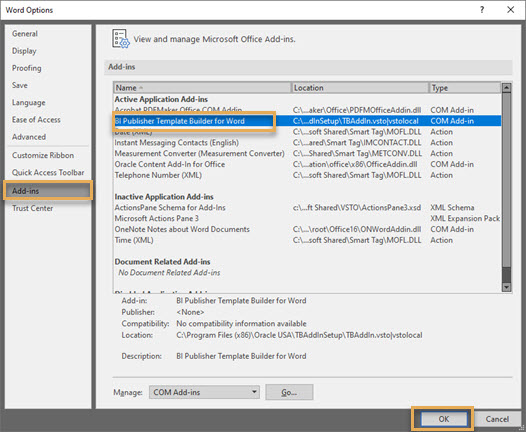
Click on Options from the left panel. From the dialog box select Add-ins on the left and select BI Publisher Template Builder for Word from the Add-ins list.
Click OK.